If you have ever been put off from making a recipe because you need to make your own pastry, read on. It is much simpler than you think.
This is my Basic Sweet Shortcrust recipe that I use for all my sweet tarts, and can be used to make biscuits too. It is simple to make and results in a beautiful crisp tart shell, of which can be filled with anything from lemon curd, ricotta, fruit, chocolate, jam, the possibilities are endless. It is so much more satisfying making your own pastry from scratch than using store-bought, and I guarantee it will taste better too. There are a few tips to ensure your pastry works out every time.
KEEP EVERYTHING AS COLD AS POSSIBLE
That means everything, the kitchen, the ingredients, even your hands. That’s why pastry chefs work in a cold room (not in with the rest of the kitchen). Heat is pastry’s kryptonite, and will result in a chewy, cardboard texture. So make sure the room is cool, turn on the air con if necessary. If it’s a really hot day and you can’t get the room cool, consider making something else.
The butter should be rock hard, straight out of the fridge. Avoid touching too much as you chop it, the warmth from your hands is all it needs to start melting. I even store my flour in the fridge (which avoids weevils in the pantry too). Cold ingredients ensures crisp short pastry.
USE A FOOD PROCESSOR
Now if you don’t own a food processor I’m not saying you can’t make shortcrust pastry, but it is a million times easier with one (and no, I’m not exaggerating). Like I said, pastry hates heat. Using a food processor means your hands hardly have to touch the dough at all, so no transfer of body heat. It also makes the whole process super fast. If you do want to make it by hand, use a pastry cutter, which is a wire contraption that cuts the dough without the need to use your fingertips to knead the butter into the flour.
MIX UNTIL JUST COMING TOGETHER
Don’t be tempted to keep mixing (or kneading) the dough until it forms a solid mass. It is ready when it just starts to clump together. The key is to work it the least amount possible.
CHILL
Ever wondered why pastry shrinks when it cooks? Because the dough wasn’t cold enough before it was cooked. Wrap in cling-film and chill for 30 minutes in the fridge (or 10 in the freezer if you want to speed things up). Once rolled into the tin, whack it in the fridge/freezer again. The colder the pastry is prior to cooking, the better.
USE BAKING PAPER
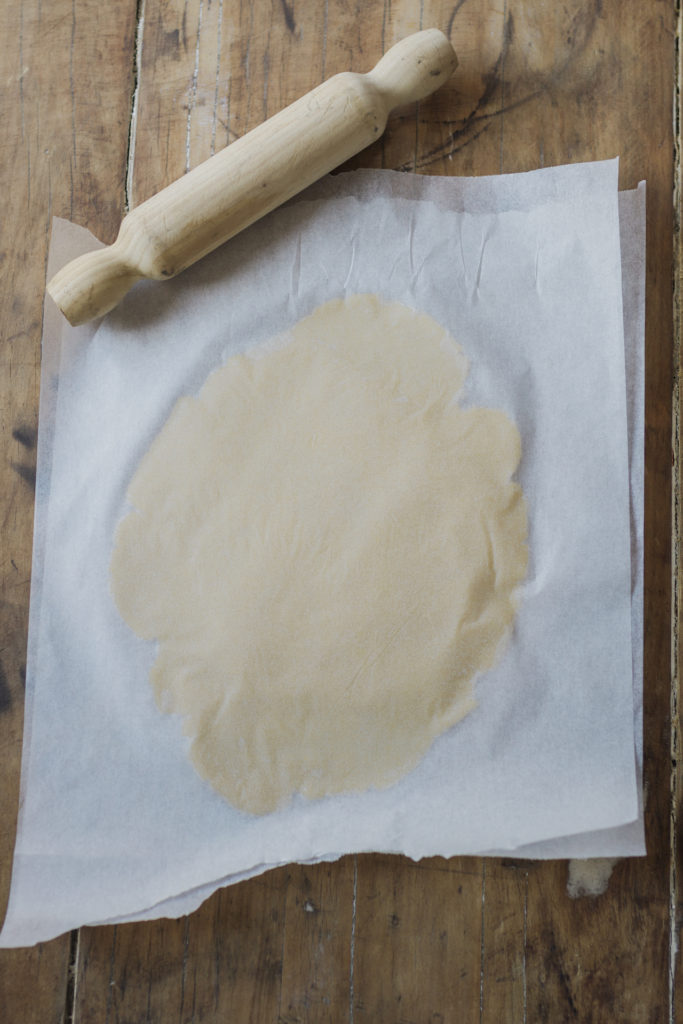
To avoid those warm hands again, roll the dough in-between two large sheets of baking paper. It also means you don’t need to flour the bench-top to avoid it sticking, which can result in too much flour and therefore a tougher dough. This also makes it very easy to turn the dough into your tart tin, peel off one sheet, flip over, then peel the second sheet off as you carefully press the dough in.
DON’T SKIP BLIND BAKING
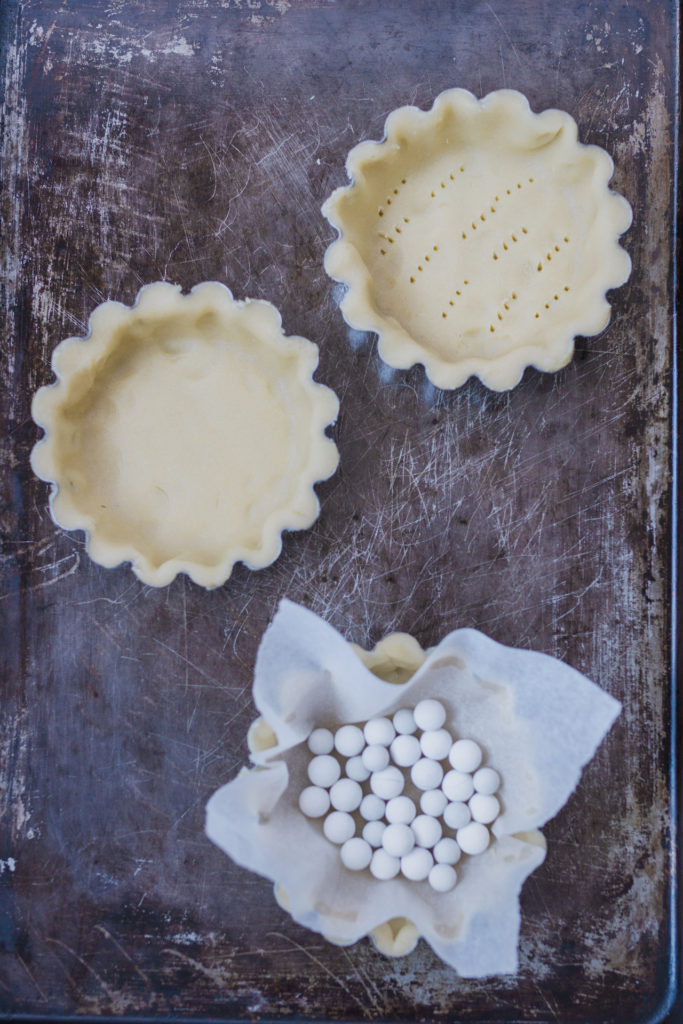
I know it sounds like a tedious task, but blind baking means the difference between a crisp or soggy bottom. Not all recipes require it, but don’t be tempted to skip when the recipe asks for it. It really isn’t difficult. Re-use one of those sheets of baking paper you rolled out the dough in and place it into the centre of the tart shell. Fill with ceramic pastry weights (cheap and easy to find from kitchenware stores) or rice or dried beans (which can be cooled and stored for next time – don’t eat them!) and bake for 15 minutes, carefully remove the paper and weights and cook until desired colour (depending on the recipe).
USE A BAKING TRAY
To avoid mishaps, I always place my tarts onto a baking tray so I don’t have to touch the tart tin at all. This is particularly important when lifting a tin with a loose bottom (nothing worse than lifting a hot tart out of the oven and it landing on the floor).
FREEZE
Not essential, but it’s handy to know pastry freezes really well. You can clump it into a ball, wrap in cling-film and freeze in it’s frozen state for up to three months. Defrost in the fridge overnight. Or roll into your tart tin (or tins) and freeze until ready to fill. It’ll keep for up to three months, so if you’re going to the trouble of making pastry, make extra for another day.
Cooked empty tarts also freeze well. Once fully baked, cool, and store in airtight containers in the freezer.
Ok – so now you know the tips for success, let’s make pastry.
This recipe makes enough pastry to line 1 x 23cm round or square tin, 1 x 35 x 12cm rectangular tin, or 6 x 10cm round tins:

Shortcrust Pastry - Sweet
Ingredients
Method
- Put the flour, sugar, rind and salt into a food processor and pulse to combine.
- Add the cold butter and pulse until the mixture resembles fine breadcrumbs.
- Add the egg and vanilla and pulse just until it starts to cling together to form a dough.
- Add up to 2 tbsp cold water if the mixture seems dry.
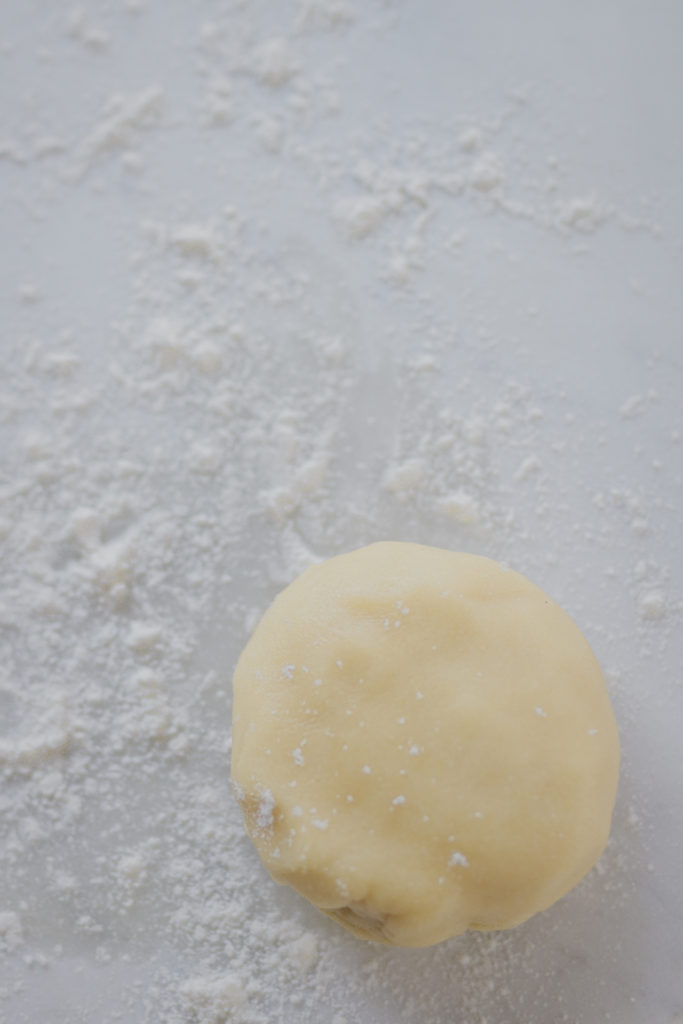
- Remove and form into a disk, cover with clingfilm and refrigerate for 30 minutes.
- Roll out the dough in-between two sheets of baking paper to fit the shape of your tin(s), around 3mm thick. Peel one sheet of paper off and flip the pastry into the tart tin. If making small tarts, cut with a round cutter prior. Peel the second sheet of paper off and gently press the pastry into the tin, trimming any edges.
- Prick the base all over with a fork and return to the refrigerator for 15 minutes (or the freezer for 5 minutes).
- The tart is now ready to fill and cook. If the recipe asks for the tart to be bling baked proceed as follows:
- Preheat the oven to 200C (180C fan forced).
- Place baking paper into the cold pastry lined tart tin(s) and fill with pie weights (or rice or beans). Place onto a baking tray and transfer to the oven.
- Bake for 15 minutes, then remove the baking paper and weights, turn the oven down to 180C (160C fan forced) and bake for another 7 minutes or until blonde in colour.
- Fill and cook as per whatever recipe you are making.
- If the tart filling does not require cooking, continue cooking the tart shell until golden and cooked through. Once cool, it can be filled with anything from fresh fruit, sweetened cream, mousse or ice-cream.
Notes
Photo Credits: Locket Photography


I could not resist commenting. Exceptionally well written!|
Thankyou!